Solrのベンチマークツールについて考える
以下でいい感じに諸々のソフトウェアを一発起動するところまではやったので、次は負荷をかけるベンチマークツールについて調べてみる。
5分くらいググってみた結論としては、これが決定版というのは見当たらなかった。
これがそれっぽいかと思ったけど、どちらかというとSolrの開発者向けのツールっぽい気配。
cluster-test.json : Creates an 8 node cluster and create 1000 collections of various and measure shutdown & restart performancenumShards stress-facets-local.json : Indexes 20 million documents from an ecommerce events dataset, issues 5k facet queries against it. prs-vs-nonprs.json : Creates 1k collections using non-PRS mode (default), then restarts 7 nodes, then cleans up, and repeats the same for PRS.
検索すると以下もヒットするのだけど、紹介されているのはPerlのスクリプトだったりすでにメンテされていないツールだったりで、ちょっと扱いにくい。
HTTPで検索/更新できるので、まあ好きにやってくれということなんだろうか。
ベンチマークツールっていろいろあるけど(有名どころだとApache JMeter, Gatling, Rocustとか)、実はこれまで機会がなく、どれも自分で使ってみたことがないので悩ましい。
SolrとPrometheusとGrafanaをdocker-composeで抱き合わせ起動する
つづき。こんな感じでyamlを書けばよさそう。
version: "3.9"
services:
  solr:
    image: "solr:9.2.1"
    container_name: solr
    ports:
      - "8983:8983"
    volumes:
      - data:/var/solr
    command:
      - solr-precreate
      - gettingstarted
  prometheus:
    image: prom/prometheus
    container_name: prometheus
    ports:
      - "9090:9090"
    environment:
      - DS_PROMETHEUS=Prometheus
    volumes:
      - ./prometheus.yml:/etc/prometheus/prometheus.yml
  solr-exporter:
    image: "solr:9.2.1"
    container_name: solr-exporter
    ports:
      - "8989:8989"
    environment:
      - SOLR_URL=http://solr:8983/solr
    command: /opt/solr/contrib/prometheus-exporter/bin/solr-exporter
    depends_on:
      - solr
  grafana:
    image: grafana/grafana
    container_name: grafana
    ports:
      - "3000:3000"
    volumes:
      - ./provisioning/dashboards:/etc/grafana/provisioning/dashboards
      - ./provisioning/datasources:/etc/grafana/provisioning/datasources

volumes:
  data:
ディレクトリ構成はこう。
# tree
.
├── docker-compose.yml
├── prometheus.yml
└── provisioning
    ├── dashboards
    │   ├── default.yaml
    │   └── grafana-solr-dashboard.json
    └── datasources
        └── datasource.yml
dashboard/default.yaml と datasource.yml は以下のZennを参考にさせてもらった。
grafana-solr-dashboard.jsonは以下のjson。
jsonはそのままだとデフォルトだとデータソースが ${DS_PROMETHEUS}になっていてうまく表示されなかったので、以下のissueを眺めながらjsonの ${DS_PROMETHEUS} を Prometheus に一括置換した。
github.com
あまり見なさそうなメトリクスも結構多いので、ダッシュボードは自分で作ってもいいかもしれないと思った。
Solrとprometheusをdocker-composeで抱き合わせ起動する
ほぼほぼsolrのガイドに記載されているyamlにprometheusというserviceを追加しただけ。とりあえずこれでprometheusが一緒に起動する。
version: "3.9"
services:
  solr:
    image: "solr:9.2.1"
    ports:
      - "8983:8983"
    volumes:
      - data:/var/solr
    command:
      - solr-precreate
      - gettingstarted
  prometheus:
    image: prom/prometheus
    container_name: prometheus
    ports:
      - "9090:9090"
    volumes:
      - ./prometheus.yml:/etc/prometheus/prometheus.yml
volumes:
  data:
solr-exporterも起動したいのだけど(solr-exporterはsolr本体とセットでバイナリが配布されているのだけど)、dockerに不慣れで、どうやったらsolrとsolr-exporterをいい感じに起動できるのかわかっていない。もう一つサービスを追加するのだろうか.....?
つづきはまた明日。
EC2でsolrを起動する
EC2でsolrのパフォーマンステストを実施してみたく、まずスタンドアローンで動かしてみたのでメモ。 ちなみにEC2を使ったのは生まれて初めてである。
手順
- EC2のインスタンスを立ち上げる
- sshしてdockerをインストールする
- 適当なdocker-compose.ymlを書いて
docker compose upする - インスタンスの管理画面から
セキュリティグループ>インバウンドのルール編集で、8983にTCPでアクセスできるようにする
これでブラウザから、EC2で起動したsolrの管理画面にアクセスできた。
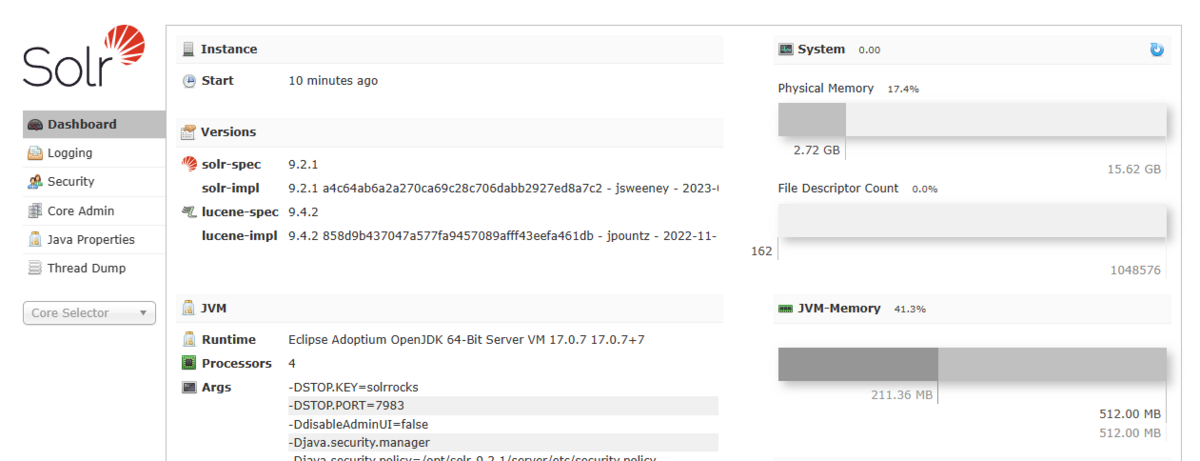
docker-compose.ymlはこんな感じ。
version: "3.9"
services:
  solr:
    image: "solr:9.2.1"
    ports:
      - "8983:8983"
    volumes:
      - data:/var/solr
    command:
      - solr-precreate
      - gettingstarted
volumes:
  data:
雑多にメモ
- インスタンスを作成する際に、Amazon Linuxというやつもあったけど、一般的な環境が良かったのでUbuntuにした
- t2.microとか、tから始まるやつはバーストなんちゃらというやつで、CPUが追い込みをかけるやつらしい。パフォーマンステストには不向きかもしれないので避けた
- 1vcpuのt2.microで起動しようとしたら180秒以内に起動しなかった。
- 同じ手順で、m4.xlargeだと起動できた
- この人はt2.mediumで起動してるのでこれで十分かも Tutorial – Deploying Solrcloud 8 on Amazon EC2 | France Labs Enterprise Search Blog
Solr CloudをEC2で動かすというのは下記のガイドがあるのだけど、EC2自体始めてなのでハードルが高く、まずは簡単なことから試してみた。 solr.apache.org
ベンチマークを取るなら、最低限の構成をSolr Cloudで組んだ方がいいのだろうか。EC2だとお金もかかるので(数百円だけど)できればスタンドアローンでいろいろと実験したいところだ。
Apache Solr入門を読む(4)_インデックスの更新
Apache Solr入門の第三章、インデックスの更新について読んでいく。
実験用のコアの作成
書籍のサンプルでもよいのだけど、solrのリポジトリにexampledocsがあるのを発見したので、折角なのでそちらを使ってみる。
参照:solr/solr/example at releases/solr/9.2.1 · apache/solr · GitHub
まず、デフォルトで準備されている設定を使ってtechproductという名前のコアを作成する。
solr@91ae230d58a3:/opt/solr-9.2.1$ /opt/solr/bin/solr create_core -c techproducts -d sample_techproducts_configs

Created new core 'techproducts'
exampledocs以下には様々なデータが準備されているのだけど、どうやらtechproductsのスキーマはそれらが入るようにいい感じに準備されている様子。
solr/managed-schema.xml at releases/solr/9.2.1 · apache/solr · GitHub
データの投入(curl)
どれか一つの形式で入れられれば不都合ない気がするので、jsonで入れていく。jsonはjqで簡単に処理できるし、pythonとかで触るのも比較的慣れているので使いやすい。
まず、q以外何も指定しない男気クエリを使って、最初は何も入っていないことを確認する。
$ curl "http://localhost:8983/solr/techproducts/select?q=*%3A*"
{
  "responseHeader":{
    "status":0,
    "QTime":2,
    "params":{
      "q":"*:*"}},
  "response":{"numFound":0,"start":0,"numFoundExact":true,"docs":[]
  }}
次に、books.json をcurlで入れてみる。
公式のガイドだと、投入の方法はこの辺りに記載がある。 Indexing with Update Handlers :: Apache Solr Reference Guide
$ curl 'http://localhost:8983/solr/techproducts/update?commit=true' --data-binary @example/exampledocs/books.json -H 'Content-type:application/json'
{
  "responseHeader":{
    "status":0,
    "QTime":484}}
ドキュメントが投入されていることが確認できる。
$ curl "http://localhost:8983/solr/techproducts/select?q=*%3A*&fl=name"
{
  "responseHeader":{
    "status":0,
    "QTime":2,
    "params":{
      "q":"*:*",
      "fl":"name"}},
  "response":{"numFound":4,"start":0,"numFoundExact":true,"docs":[
      {
        "name":"The Lightning Thief"},
      {
        "name":"The Sea of Monsters"},
      {
        "name":"Sophie's World : The Greek Philosophers"},
      {
        "name":"Lucene in Action, Second Edition"}]
  }}
データの投入(postツール)
一回すべてのドキュメントを削除する。
$ curl "http://localhost:8983/solr/techproducts/update?commit=true" --data-binary '{"delete":{"query":"*:*"}}'
{
  "responseHeader":{
    "status":0,
    "QTime":321}}
postツールを使って更新してみる。-format solr をつけないと、ドキュメントは入るのだけど、フィールドがパースされない( _src にjsonがそのまま入っておわりだった)ので注意が必要。
solr@91ae230d58a3:/opt/solr-9.2.1$ /opt/solr/bin/post -c techproducts -format solr /opt/solr/example/exampledocs/books.json
/opt/java/openjdk/bin/java -classpath /opt/solr/server/solr-webapp/webapp/WEB-INF/lib/solr-core-9.2.1.jar -Dauto=yes -Dformat=solr -Dc=techproducts -Ddata=files org.apache.solr.util.SimplePostTool /opt/solr/example/exampledocs/books.json
SimplePostTool version 5.0.0
Posting files to [base] url http://localhost:8983/solr/techproducts/update...
Entering auto mode. File endings considered are xml,json,jsonl,csv,pdf,doc,docx,ppt,pptx,xls,xlsx,odt,odp,ods,ott,otp,ots,rtf,htm,html,txt,log
POSTing file books.json (application/json) to [base]
1 files indexed.
COMMITting Solr index changes to http://localhost:8983/solr/techproducts/update...
Time spent: 0:00:00.242
-format solrをつけることで、jsonが/update/json/docsではなく/updateに送られる。 ガイドを見た感じ、/update/json/docsは単一のドキュメントを更新するのに使って、/updateは複数を受け付けられるのかなと思う。それぞれ期待するjsonの形式が違っている。 https://solr.apache.org/guide/solr/9_2/indexing-guide/indexing-with-update-handlers.html
solr@91ae230d58a3:/opt/solr-9.2.1$ /opt/solr/bin/post -h

Usage: post -c <collection> [OPTIONS] <files|directories|urls|-d ["...",...]>
    or post -help

   collection name defaults to DEFAULT_SOLR_COLLECTION if not specified

OPTIONS
=======
  Solr options:
    -url <base Solr update URL> (overrides collection, host, and port)
    -host <host> (default: localhost)
    -p or -port <port> (default: 8983)
    -commit yes|no (default: yes)
    -u or -user <user:pass> (sets BasicAuth credentials)

  Web crawl options:
    -recursive <depth> (default: 1)
    -delay <seconds> (default: 10)

  Directory crawl options:
    -delay <seconds> (default: 0)

  stdin/args options:
    -type <content/type> (default: application/xml)

  Other options:
    -filetypes <type>[,<type>,...] (default: xml,json,jsonl,csv,pdf,doc,docx,ppt,pptx,xls,xlsx,odt,odp,ods,ott,otp,ots,rtf,htm,html,txt,log)
    -params "<key>=<value>[&<key>=<value>...]" (values must be URL-encoded; these pass through to Solr update request)
    -out yes|no (default: no; yes outputs Solr response to console)
    -format solr (sends application/json content as Solr commands to /update instead of /update/json/docs)


Examples:

* JSON file: /opt/solr/bin/post -c wizbang events.json
* XML files: /opt/solr/bin/post -c records article*.xml
* CSV file: /opt/solr/bin/post -c signals LATEST-signals.csv
* Directory of files: /opt/solr/bin/post -c myfiles ~/Documents
* Web crawl: /opt/solr/bin/post -c gettingstarted https://solr.apache.org/ -recursive 1 -delay 1
* Standard input (stdin): echo '{commit: {}}' | /opt/solr/bin/post -c my_collection -type application/json -out yes -d
* Data as string: /opt/solr/bin/post -c signals -type text/csv -out yes -d $'id,value\n1,0.47'
それにしてもこのツール、多機能でびっくりだ。コマンド自体はシンプルなシェルスクリプトなんだけど、実態は以下のクラスで、Simple?と言いたくなるくらいいろいろ機能がある様子。
solr/SimplePostTool.java at releases/solr/9.2.1 · apache/solr · GitHub
Apache Solr入門を読む(3)_デフォルトのschema.xmlを眺める
Apache Solr入門の第二章、スキーマに関する部分を読んでいく。
schema.xmlだとコアのリロード(あるいはsolrの再起動)が必須なのだけど、managed-schemaをSchema APIから変更した場合は即時反映されるらしい。面白そうなのでちょっとやってみる。
実験用のコアを作成
コマンドラインから作成する。-dオプションを使わずに起動するとデフォルトのconfigsetが選択され、本番で使うのはおすすめしないぜって警告が出てくる。
solr@91ae230d58a3:/opt/solr-9.2.1$ /opt/solr/bin/solr create_core -c sandbox_schema
WARNING: Using _default configset with data driven schema functionality. NOT RECOMMENDED for production use.
         To turn off: bin/solr config -c sandbox_schema -p 8983 -action set-user-property -property update.autoCreateFields -value false

Created new core 'sandbox_schema'
気にせずもう一つ作る。
solr@91ae230d58a3:/opt/solr-9.2.1$ /opt/solr/bin/solr create_core -c sandbox_schema_legacy
WARNING: Using _default configset with data driven schema functionality. NOT RECOMMENDED for production use.
         To turn off: bin/solr config -c sandbox_schema_legacy -p 8983 -action set-user-property -property update.autoCreateFields -value false

Created new core 'sandbox_schema_legacy'
sandbox_schema_legacyの方は、 schema.xml を参照するように設定をいじっておく。
solr@91ae230d58a3:/opt/solr-9.2.1$ diff /var/solr/data/sandbox_schema/conf/solrconfig.xml /var/solr/data/sandbox_schema_legacy/conf/solrconfig.xml
23a24,25
>   <schemaFactory class="ClassicIndexSchemaFactory"/>
>
書籍ではClassicSchemaFactroyと書いてたけど、それだと Caused by: java.lang.ClassNotFoundException: ClassicSchemaFactory とか言ってエラーになるのでガイドを見て適当に書き換えた。
Schema Factory Configuration :: Apache Solr Reference Guide
solrconfig.xmlの修正が終わったら、manage-scemaをrenameしてschama.xmlにしておく(切り替えるなら必要かなと思ってやったけど、これは実際意味があったのかはわからない)。
solr@91ae230d58a3:/opt/solr-9.2.1$ ls /var/solr/data/sandbox_schema_legacy/conf
lang  protwords.txt  schema.xml  solrconfig.xml  stopwords.txt  synonyms.txt
これで、managed-schemaとschema.xml、それぞれのコアで別々に実験することができる。
最小設定で起動してみる
デフォルト設定のschema.xmlはあれこれ書いてあって、素人が見ると何が何やらになってしまう。 見通しをよくするために、コメントや使っていない設定をごっそり消して、schema.xmlをなるべく小さくしてみる。
<?xml version="1.0" encoding="UTF-8" ?>
<schema name="default-config" version="1.6">
    <field name="id" type="string" indexed="true" stored="true" required="true" multiValued="false" />
    <field name="_version_" type="plong" indexed="false" stored="false"/>
    <field name="_root_" type="string" indexed="true" stored="false" docValues="false" />
    <field name="_nest_path_" type="_nest_path_" /><fieldType name="_nest_path_" class="solr.NestPathField" />
    <field name="_text_" type="text_general" indexed="true" stored="false" multiValued="true"/>

    <uniqueKey>id</uniqueKey>

    <fieldType name="string" class="solr.StrField" sortMissingLast="true" docValues="true" />
    <fieldType name="plong" class="solr.LongPointField" docValues="true"/>

    <fieldType name="boolean" class="solr.BoolField" sortMissingLast="true"/>
    <fieldType name="booleans" class="solr.BoolField" sortMissingLast="true" multiValued="true"/>
    <fieldType name="pdates" class="solr.DatePointField" docValues="true" multiValued="true"/>
    <fieldType name="plongs" class="solr.LongPointField" docValues="true" multiValued="true"/>
    <fieldType name="pdoubles" class="solr.DoublePointField" docValues="true" multiValued="true"/>

    <fieldType name="text_general" class="solr.TextField" positionIncrementGap="100" multiValued="true">
      <analyzer type="index">
        <tokenizer name="standard"/>
        <filter name="stop" ignoreCase="true" words="stopwords.txt" />
        <filter name="lowercase"/>
      </analyzer>
      <analyzer type="query">
        <tokenizer name="standard"/>
        <filter name="stop" ignoreCase="true" words="stopwords.txt" />
        <filter name="synonymGraph" synonyms="synonyms.txt" ignoreCase="true" expand="true"/>
        <filter name="lowercase"/>
      </analyzer>
    </fieldType>

</schema>
これで34行。もともとが1034行なので、ちょうど1000行ほど消したことになる。
スキーマを変更したら、coreをリロードする必要がある。リロードはAPIから実行することができて、成功すると以下のようなレスポンスが返ってくる。
# curl "http://localhost:8983/solr/admin/cores?action=RELOAD&core=sandbox_schema_legacy"
{
  "responseHeader":{
    "status":0,
    "QTime":92}}
ちなみにリロードに失敗するとこんな感じで500が返ってくる。schemaのどこがだめだったかログに出してくれるので大変わかりやすい。
# curl "http://localhost:8983/solr/admin/cores?action=RELOAD&core=sandbox_schema_legacy"
{
  "responseHeader":{
    "status":500,
    "QTime":89},
  "error":{
    "metadata":[
      "error-class","org.apache.solr.common.SolrException",
      "root-error-class","org.apache.solr.common.SolrException"],
    "msg":"Unable to reload core [sandbox_schema_legacy]",
    "trace": [スタックトレースがここに表示される],
    "code":500}}
たとえば、必要な定義が足りなかったらこんな感じで表示される。
Caused by: org.apache.solr.common.SolrException: fieldType 'pdoubles' not found in the schema
schema.xmlの以下の部分に関しては、使っていないと思ったので一回消して、ログでいわれるがままに追加した。どうやら必要らしい。
    <fieldType name="boolean" class="solr.BoolField" sortMissingLast="true"/>
    <fieldType name="booleans" class="solr.BoolField" sortMissingLast="true" multiValued="true"/>
    <fieldType name="pdates" class="solr.DatePointField" docValues="true" multiValued="true"/>
    <fieldType name="plongs" class="solr.LongPointField" docValues="true" multiValued="true"/>
    <fieldType name="pdoubles" class="solr.DoublePointField" docValues="true" multiValued="true"/>
(追記)SOに同じことを疑問に思っている人がいた。実際に確認してみると、たしかにsolrconfig.xmlの中で型を参照していた。
schema.xmlを眺めてみる
小さくした設定を見てみると、ほとんどが型の定義で、フィールド自体は5つしかないことがわかる。アンスコで挟まれているやつはシステムで使う値っぽい雰囲気もするので、実質はidの一つだけだろうか。
また、 text_general の定義だけかなり長く、異彩を放っている。どうやらこれが2.4.3節に記載されているテキスト系フィールドタイプというやつらしい。
    <fieldType name="text_general" class="solr.TextField" positionIncrementGap="100" multiValued="true">
      <analyzer type="index">
        <tokenizer name="standard"/>
        <filter name="stop" ignoreCase="true" words="stopwords.txt" />
        <filter name="lowercase"/>
      </analyzer>
      <analyzer type="query">
        <tokenizer name="standard"/>
        <filter name="stop" ignoreCase="true" words="stopwords.txt" />
        <filter name="synonymGraph" synonyms="synonyms.txt" ignoreCase="true" expand="true"/>
        <filter name="lowercase"/>
      </analyzer>
    </fieldType>
更新時と検索時のanalyzerが定義されていて、それぞれのanalyzerの中でtokenizerとfilterが定義されている。本によるとcharFilter(文字フィルタ)というのもあるらしい。
analyzerに関してはドキュメントのここに詳しい:https://solr.apache.org/guide/solr/9_2/indexing-guide/analyzers.html
個人的には検索時のanalyzerってが面白いなとおもった。記事を投入したときに(転置インデックスを作るために)トークナイズすることや、表記ゆれや大文字小文字なんかをそろえるためにフィルター処理をかけるのは想像ができたけど、検索時も同じ処理が必要というのは、言われてみれば確かになあという感じだ。
見通しをよくするために消してしまったけど、デフォルトのスキーマに日本語用のテキスト系フィールドタイプも定義されている。そっちもfilterが多かったりして面白い(それぞれのフィルタの役割や例も本で紹介されていて面白い)。他の言語も大量にあって、solrが世界的に使われていることがよくわかる
storedについて
本の2.5節で、field定義するときの重要なオプションとしてstoredが紹介されていて、「stored=trueにするとインデックスサイズが増える」という記載があったのだけど、これの理由がよくわからない。
「インデックス」と呼ばれているのは記事を引っ張ってくるための目次で、記事のデータ自体が増えてもインデックスサイズに影響ないのではと思ったのだけど・・・
本を読み進めたらわかるかもしれないので楽しみにしておく。
Apache Solr入門を読む(2)_basic_configは存在しない
Apache Solr入門の第二章、スキーマに関する部分を読んでいく。
どうでもいい話なのだけど、書籍ではbasic_configsに含まれるスキーマを使って動作を確認しているが、solr 9.2.1だとこの設定は存在しない。
本に書いてある通りやってみるとエラーになる。
solr@91ae230d58a3:/opt/solr-9.2.1$ /opt/solr/bin/solr create_core -c solrbook -d basic_configs

Specified configuration directory basic_configs not found!
/opt/solr 以下にはsolrの本体が配置されていて、solrコマンドだけでなく、ほかにも便利なコマンドやらサンプルデータやらいろいろある。
solrコマンドの中身はどうやら馬鹿デカいシェルスクリプトらしく、何をやっているのか簡単に見ることができる。今回のエラーはここ。 https://github.com/apache/solr/blob/releases/solr/9.2.1/solr/bin/solr#L1157-L1160
参照先を見てみると、 basic_config は存在していない。
solr@91ae230d58a3:/opt/solr-9.2.1$ ls /opt/solr/server/solr/configsets/
_default  sample_techproducts_configs
- 書籍時点の最新版6.3.0では存在している:https://github.com/apache/solr/tree/releases/lucene-solr/6.3.0/solr/server/solr/configsets
- どうやら7.0.0になるときに消滅したらしい:https://github.com/apache/solr/tree/releases/lucene-solr/7.0.0/solr/server/solr/configsets
これ自体はどうでもいい話なのだけど、こういうことを確認しているうちに、リポジトリのどこに何があるのかなんとなくわかってくるので面白い。
